Mega ISP
Mega-ISP will make your Arduino function as an AVR-ISP programmer. Mega-ISP seems to be better maintained than Programmer2.
Mega-ISP is shipped with the Arduino software from version 0018 as an example called ArduinoISP. This also has a tutorial page with the right wiring.
Problem with auto reset
Arduinos with auto reset capabilities(i.e. Diecimila, Duemilanove) will likely need to have the auto-reset functionality disabled. When a program(i.e. avrdude) connects to a serial port the DTR line is set and unset, which triggers a reset. Avrdude (as of v5.6) connects to the Arduino before it has booted. The problem may manifest itself with the error message "avrdude: stk500_getsync(): not in sync: resp=0x15". The problem may also manifest itself withe the error message "avrdude: verification error, first mismatch at byte 0x0000 0x3F != 0x00". This happens when Avrdude connects to the Arduino bootloader on the host. The Arduino bootloader supports a subset of the same STK500 protocol that Mega ISP uses but always returns 0x00 when reading the lock bits.
https://playground.arduino.cc/Main/DisablingAutoResetOnSerialConnection
Alternatively avrdude would have to be patched to accept a delay between connection and programming, and Arduino to request the delay.
There's been success by adding sleep(4); at the end of ser_open() found on avrdude-5.10's ser_posix.c. Backup your unmodified binary, as the modified avrdude won't be able to program arduinos normally because the delay will make it miss the window after the auto-reset.
Links:
- Mega-ISP: http://code.google.com/p/mega-isp
- ArduinoISP tutorial: http://arduino.cc/en/Tutorial/ArduinoISP
Guide:
This is a short guide on how to use your Arduino as an ISP, it was first published on the Arduino forum, so go visit if you have any questions: http://arduino.cc/forum/index.php/topic,65099.msg475663.html#msg475663
I recently bought the "Graphic LCD Serial Backpack" from Sparkfun (http://www.sparkfun.com/products/9352). When reading the comments for the product. I discovered that a user named "SummoningDark", had made a new improved firmware. A lot of people asked Sparkfun to change the official firmware with the new one, so i decided to check it out. The problem were that I do not own a programmer, so at first I thought that I had to buy one. But after some googling I found out that the Arduino could actually be used as an In System Programmer (ISP). After a lot of work I finally got it working and it has really improved the perfomance of the screen. The speed is much higher (SummoningDark says 10 times) and there are no more bugs (with the old firmware the screen would suddenly write the text or a line a odd place).
I will now try to explain as best as I can, how to upload the new firmware. NB: You can also use this guide if you need a different bootloader or another hex file on any AVR. This is just meant as an example.
The following DO NOT work with the Arduino Uno, for more information visit: http://arduino.cc/en/Tutorial/ArduinoISP
1) Start up the Arduino IDE (http://arduino.cc/en/Main/Software)
2) Go to File>Exampels>ArduinoISP and upload the software onto your Arduino - if your .hex file is more than 255bytes, you should use the newest version found on this page: http://code.google.com/p/mega-isp/issues/detail?id=14&can=1 (Version dev04b is confirmed to work)
3) Now you have to install AVRDude. I recommend downloading CrossPack (http://www.obdev.at/products/crosspack/) for Max OX and WinAVR (http://winavr.sourceforge.net) for Windows as it includes all you will need. Including an AVR compiler and AVRDude
4) Download the program your want to upload. In my case it is the new firmware for the Serial Backpack (http://serialglcd.sourceforge.net)
5) Compile the program to make a hex file, this can be done by typing "make all" in a terminal while inside the folder (use "cd" and then the path to the folder - see step 11 for help)
You might have to change some setting for it to work. If there is already an hex file (as in my example) you can just skip this step
6) Now connect the Arduino to the device you want to program. The pin used by the Arduino are as follows:
- 10: slave reset
- 11: MOSI
- 12: MISO
- 13: SCK
You have to connect these pins including VCC (5V with the Serial BackPack) and GND to the ISP header on your device like so: 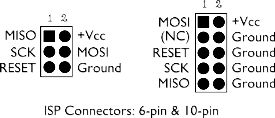
If you are programming an AVR directly or an Arduino board. See this page for information: http://arduino.cc/en/Tutorial/ArduinoISP
You might also want to connect three LED's (with resistors) on the following pins:
- 9: Heartbeat - shows the programmer is running
- 8: Error - Lights up if something goes wrong (use red if that makes sense)
- 7: Programming - In communication with the slave
7) The next thing you have to do is to connect a 120 ohm resistors (I use a 100 ohm and two 10 ohm resistors) between the 5V and reset headers on the Arduino to disable auto reset on serial connection (https://playground.arduino.cc/Main/DisablingAutoResetOnSerialConnection) - some people do not need this small hack, so if you have problems to get it working, try without the 120 ohm resistor
8 ) Start up a terminal program. On a Mac simply find the terminal app in the programs folder. If you are using Windows open "run" and type "cmd". Your should now have a terminal window open
9) Now you have to figure out what port your Arduino is using. On a Mac simply type "ls -l /dev/cu.*" in the terminal and all your serial ports should pop up. If you are using Windows open Device Manager>ports and find your Arduino's COM-port. My port is: "/dev/cu.usbserial-A700dX8R", so I will use it in the following example
10) Write the following command in the terminal:
avrdude -p m168 -P /dev/cu.usbserial-A700dX8R -c avrisp -b 19200
"/dev/cu.usbserial-A700dX8R" should be replaced by your port. If your Arduino is on COM port 1, you should write "com1" instead. "m168" means that the target is a ATmega168 see this link for other aliases: http://www.nongnu.org/avrdude/user-manual/avrdude_4.html#Option-Descriptions
The teminal will print out something like this:
avrdude: AVR device initialized and ready to accept instructions
Reading | ################################################## | 100% 0.13s
avrdude: Device signature = 0x1e9406
avrdude: safemode: Fuses OK
avrdude done. Thank you.
Where 0x1e9406 is atmega168 device signature (look in avrdude.conf for other signatures)
11) If everything worked well it is now time for programming your device. The first thing you have to do is go inside the folder where your hex file is located. In my case I just copied the folder "trunk" to the main directory in the harddisk. Your should then use the following command:
cd /trunk
12) Next step is almost the same as 10), but this time you should add -U flash:w:filename to the command. Where "filename" should be replaced with the name of your hex file. In my case the name is "main.hex" so the command should look like this:
avrdude -p m168 -P /dev/cu.usbserial-A700dX8R -c avrisp -b 19200 -U flash:w:main.hex
The terminal will then print something like this:
avrdude: AVR device initialized and ready to accept instructions
Reading | ################################################## | 100% 0.13s
avrdude: Device signature = 0x1e9406 avrdude: NOTE: FLASH memory has been specified, an erase cycle will be performed
To disable this feature, specify the -D option.
avrdude: erasing chip avrdude: reading input file "main.hex" avrdude: input file main.hex auto detected as Intel Hex avrdude: writing flash (11210 bytes):
Writing | ################################################## | 100% 14.03s
avrdude: 11210 bytes of flash written avrdude: verifying flash memory against main.hex: avrdude: load data flash data from input file main.hex: avrdude: input file main.hex auto detected as Intel Hex avrdude: input file main.hex contains 11210 bytes avrdude: reading on-chip flash data:
Reading | ################################################## | 100% 12.89s
avrdude: verifying ... avrdude: 11210 bytes of flash verified
avrdude: safemode: Fuses OK
avrdude done. Thank you.
You should now - hopefully - have a new firmware on your device :)
Hope this will be a help to some, because it really took me a long time figuring all this out.
- Lauszus